Showing posts with label Starters. Show all posts

Tuesday, September 20, 2011

Dry Yellow Peas Masala Vadai | Pattani Paruppu Vadai | Peas Fritters

There is no denying my love for deep fried snacks. If they come in round circles, with dal and crunchy bites in between, I am sold! Imagine such a delicious treat taking shape from the thought of doing away with excess stuff on hand. This recipe originally came into being because Amma had lots of Whole White Peas / Yellow peas with her. Not knowing how to use it up, she thought she might make Vadas with them. I know I love the idea.

These delicious vatana vadas make a great appetisers for the Kid's party. Of course you got to tweak the recipe a bit if you are serving it for below 5 yr olds. But otherwise the recipe is prefect and tastes simply too good. You can imagine how good if I am planning to have excess of white peas on hand..:)


The first time I actually got these peas and read about them or rather realized that there is a different type of peas all together, was when I made the Ragda Patties. The night I was to make it, I realized I didn't' have it and bought it the next day. I am still not sure if these are called white peas or yellow peas. It's called the Yellow peas in English, while called White Vatana in hindi. Now don't ask me what it's called in Tamil, I tried hooking a conversation with the salesperson and asked the name, she simply replied it's "yellow patani", can't beat the simplicity of that statement right!

Patani Vada

Yellow dried Peas / White Peas - 1 cup
Mint leaves - handful
Coriander leaves handful
Curry leaves - handful
Salt to taste
Gram flour / Besan - 1 tbsp
Red Chili powder - 1 tsp
Onion - 1 medium.

Grind to paste:

Garlic, 2- 3 cloves
Green chilli - 2 medium
Ginger  1"

Oil for Deep frying
Water just enough to make the batter

How to make the Patani Vada / Vatana Vada:

Wash and soak the peas in water overnight. Then drain water and grind the peas coarsely.

Take in a bowl, add the ginger garlic chili paste, finely chopped mint, coriander and curry leaves, besan, salt, red chili powder, onions, and mix well. The batter will have some water by now, if required sprinkle little water.

Heat oil for deep frying, take out small balls and flatten them as vadas and gently drop into hot oil.

Cook on both sides and drain on kitchen towel.

These make a lovely add on for a party table - Kid's Delight Party

Saturday, June 18, 2011

Ajwain Mini Samosa with Onion | Mini Samosa | Step by Step Recipe for Onion Mini Samosas

I have been breaking my head on what to make for the next post, while I had short listed some, none were things that I could do after getting back from home. Thinking of shortlisting the dishes for mini bites I felt I was doing something different and not really deciding on food. I have been talking to myself since morning and both Athamma, Hubby dear thought I have gone out of mind.

I must say this BM has been the most unplanned one. Though I mostly cook the previous day I will at least plan what to make and get it ready before dinner, so that we can have what I made before dinner. So making all those other dishes were out of question at 8. I had this flash thought that I have always been fond of Ajwain samosa but haven't blogged about it. So mini they will become and they did.

Everybody thought I had made more and were sad that I had only some limited numbers. The mini samosas are always great as it controls how many one eats. Everybody liked it so much that I am sure I am going to make these again.


Ajwain Mini Samosas with Roasted Onions

Ingredients Needed

For the outer layer

All purpose Flour/ Maida - 1 cup
Ajwain / Vammu - 1 tsp (more if you like)
Salt to taste
Ghee - 2 tsp
For stuffing

Onions - 1 medium
Red chili powder - 1/2 tps
Salt to taste
Chat Masala - 1/4 tsp
Amchur powder - a pinch
Garam Masala - 1/4 tsp
Oil - 1 tsp

Oil for deep frying

Method to prepare:

For the Ajwain outer layer

In a bowl, take flour, salt, ajwain and ghee, Mix well. Slowly add water and knead to a stiff dough. Cover with a wet muclin cloth and rest it for 10 mins.

To make the roasted onions.

In a non stick pan, heat oil saut in onion julinnes. Saute till the onions turn brown. Then add all the spices and combine well. Once the onions are brown and roasted well, remove and allow it to cool.

To make the samosas.

For exact steps see Potato Peas Mini Samosa

Dust the dough and roll out thin discs. Using a sharp knife cut into 3 inch strips. Place a spoon of the onion stuff and roll over diagonally across and cover well.

Press the sides and make sure the outer layer covers well.

Heat oil in a kadai and gently slide into the oil once it's hot. Cook over medium flame to get crisp samosas.


Sending this to Champa for Kid's Delight themed one Mini Bites.

Check out the Blogging Marathon page for the other Blogging Marathoners doing BM#6

Saturday, May 14, 2011

Pudachi Wadi | Coriander Rolls – Maharashtrian Special | Indian Cooking Challenge for April | How to make Pudachi Wadi Step By Step Recipe!

This month for Indian Cooking Challenge, I thought I should finally attempt at making Pudachi Wadi or Coriander Rolls a specialty dish from Maharashtra. The first time I heard this being discussed was in the GDM group, where I always get excited by the new things I get to know. One of the member was asking if anybody knew how to make Pudachi Wadi. Well I am not sure if anybody replied back with a recipe, I was sure curious to know what it was.

A simple search on google lead me to Archana of Tried & Tested Recipes. I remembered Archana from my early years of blogging. She was a good friend with whom I interacted through email. She no longer blogs, which is very sad. She has some awesome recipes on her blog which I am sure will be a good collection of dishes from her kitchen. Reading through the recipe I knew it's something I would love it. It was like trying to understand a new dish that must be quite famous in that cuisine. I knew coriander leaves a plenty now in the market and I wasn't way off in procuring it now.


Well I announced and quite simply forgot it as I planned to make it on 14th. Lataji pinged me weeks ago saying she tried and it turned out to be great. Slowly other members replied back with the same feedback. I was so excited and impatient to try it on my own. 

The ingredients are very simply, you should be having them in your pantry. Couple of the members though replied back saying Poppy seeds is not available in their place, which is sad as I replied that really adds an unique taste to the end product. The entire process gets done quite quickly and you won't really feel it being strenuous. But I was wondering how on earth this was prepared in large quantities for a big joint family. It does require couple of more helping hands to get it done. And what I realized was I had to control not finishing it off all myself and should wait to take pictures.

Lataji also referred me to Khaugiri's Pudachi Wadi. Her post was quite clear in instructions  I ended up referring her site in the end and mixing both!

In a bowl, take the wheat flour, gram flour, Red chili powder, Turmeric powder, Salt and hot oil.
Knead to a stiff dough. Add as little water as required and let it rest aside for 30 mins.
For the stuffing, heat a non stick pan with 1 tsp oil. Fry the grated dry coconut, Poppy seeds, Sesame seeds, ginger-chili paste, finely chopped garlic, red chili powder, salt. Keep stirring so that the coconut doesn't get burnt.
Wash and chopped the coriander leaves finely and add to the pan, simmer for a while till the leaves are cooked.
In a bowl, mix tamarind pulp, Garam Masala and oil. Keep it aside.

When you are ready to make these, heat a pan with oil for deep frying. Pinch out small balls the size of a ping pong ball. Roll out a disc not very thin or thick.
Spread a spoonful of Tamarind - Garam Masala paste over it.
Place a spoon of the coriander masala  and spread evenly
Then tightly roll out over the stuffing and completely seal the ends.
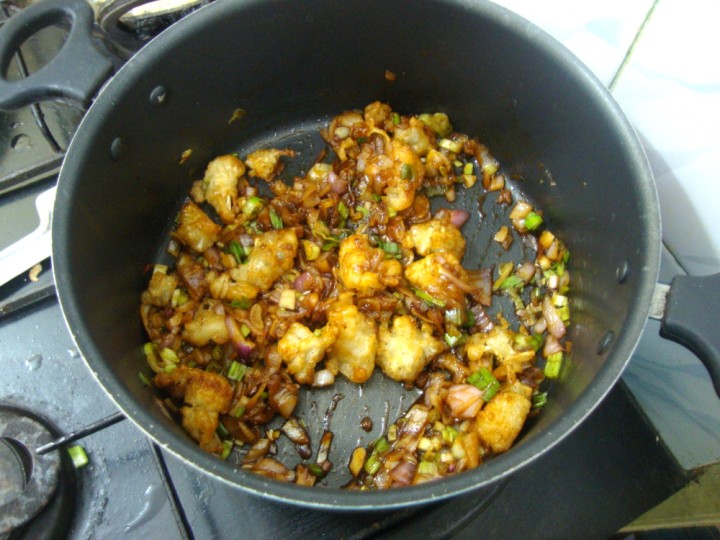
The roll will finally look like this.
When the oil is hot, deep fry the rolls over medium flame until both sides are cooked and golden in colour.


Pudachi Wadi | Coriander Rolls  – Maharashtrian Special

Ingredients Needed:

For the Outer Covering

Gram flour / Besan - 1 cup
Wheat flour - 1 cup
Chili powder - 1/2 tsp
Turmeric powder
Hot oil / Mohan - 3 tsp
Salt to taste

For the Stuffing

Coriander - 2 cups
Grated Coconut - 3/4 cup
Poppy seeds / khuskhus - 2 tsp
Garlic cloves - 3
Green chilly - Ginger paste - 1 tsp
Red Chili powder - 1 tsp
Lemon juice - 2 tsp
Salt to taste.
 
For Paste

Kala Masala / Garam Masala - 1 tsp
Oil - 1 tsp
Tamarind pulp - 2 tsp

Method to prepare:

For the Covering

In a bowl, mix all the ingredients and with some water knead a stiff dough. Let it rest for 30 mins. This is important as the first batch that rested well came out well done.

For the Coriander stuffing

Wash and finely chop the coriander leaves.

Heat a non stick pan with 1 tsp oil, add the ginger - chili paste, finely chopped garlic. Then add the dry coconut, poppy seeds, sesame seeds. salt. Keep stirring else, the coconut will get burnt. Then add the chopped coriander leaves. Cook for 2 -3 mins. When it is done, add lemon juice.

Remove from fire and allow to cool.

To make Paste

In a bowl take the tamarind pulp, garam masala and oil. Mix well.

To assemble the Pudachi Wadi

Heat a pan with oil for deep frying.

Pinch out small balls the size of ping pong balls. roll out a disc the 6". The discs should not be very thin or thick. 

Spread a spoonful of the paste over the disc. Then take 1 tsp of the coriander stuffing, spread it evenly on the top. Starting from one side tightly roll over the stuffing.

You can do this two ways. You can either flip both sides over each other and close tightly. else you can roll and flatten on all sides.

Make sure the openings are closed on all sides.

When the oil is hot, deep fry these rolls and cook on both sides.

Drain when it is done.

Serve with chutney of choice like Imli chutney, Pudina Chutney. I served with Tomato Sauce, and we simply loved it.

Notes:

One recipe called for Ginger Green Chili paste, while other didn't. I simply added both Chili - ginger paste and Chili powder also.
The recipe calls for Sugar, which I didn't add to the stuffing.
Archana's recipe calls for onions, which I completely overlooked.
Since I didn't add onions, it was good the next day too. Just heat it over tawa and serve.


************************************************************************
Today is the last day for BM group 1, will be starting the group 2 tomorrow.

Check out the Blogging Marathoners doing BM#5 along with me

Curry in a hurry under 30 min: Cool Lassi(e), Harini, Kalyani, Priya Mahadevan, Suma  
Seven Days of Colorful Dishes Kid's Special: Priya Suresh, Veena,
Seven Days of Indian Sweets: Shylaja, Srivalli 
Seven Days of Regional Specials: Priya Yallapantula  
Under 15 mins Quick Breakfast:Aarthi, Vaishali


To all my ICC members, please link your Pudachi Wadi post to Mr. Linky.

Saturday, March 19, 2011

Gobi (Cauliflower) Manchurian Dry | Step By Step Recipe

Gobi Manchurian conjures up fond memories of many occasions. Athamma loves Gobi Manchurian and the way she says sounds so musical most times that hubby dear teases her with that. She used to live in a typical southern town where you would think Gobi Manchurian must be alien. But on the other hand it was very famous and she used to enjoy that during their walks. Every time we hear that, hubby dear chuckles thinking how that local chef would've twisted the recipe beyond recognition. Not that this has an origin to claim. I guess each place has come up with a recipe that they can very well claim as theirs.

This is also the only dish by which I can get Konda to eat cauliflower. She loves the one we order at our club. And since the time Champa announced Restaurant recreations, I was planning for it but could never get around making it. Since cauliflower is in season now, I thought I should make the best and make this at the earliest. I finally made it this week and I was trilled when Konda said I was the best cook. She claimed this was more tastier than all that she has eaten till now. 
 

She is not so free in giving complements unless it really merited. Of course same goes to hubby dear. It is very hard to please him and even this didn't meet his expectations as he said it wasn't as spicy as it should be for him. So I took his share and sauteed with more green chilis and served again. I don't think any other recipe can be so forgiving as this. I tasted the spiced dish and it really gave the kick!

Most restaurant might add egg to the batter for the crispy texture, but you can make it the same way by including rice flour. As always I ended up making this after coming home from office, by which time boys were waiting for me. I was hoping it was one of those days when they will leave me alone by sitting and watching. It turned out that they were interested in seeing how I was going to make. 

Imagine a hole of a kitchen with two adults and two 4 year olds, all geared up to see how I was going to fry the florets. And their endless questions, which never quench with a simple yes or no. I got to explain every small thing in detail. But though I end up getting frustrated by the pressure that I have to get their dinner ready, they managed to sit at a place for a moment. Athamma finally said I was not to exert myself like this. 

Well I felt it was worth the trouble when Amma said it was awesome and with my colleagues liking it so much. More than anything I would go to any lengths to get Konda to eat and say that..:)


Step by Step Pictures for making this.

Wash and cut the florets into bite size ones. Soak in lukewarm salted water for 10 mins, drain.
Spring onions that brightens up the whole thing..
Have the spring onions finely chopped, Ginger-Chilies paste ready.
For the batter - All purpose flour, Corn flour, Rice flour, Soda and salt along with chili ginger paste.
Batter ready for dipping.
Best way to fry the florets is by using a spoon. This way your hands are free to do other things.
Heat a pan of oil for deep frying. Fry on both sides and drain them on a kitchen towel.
For the sauce, heat a pan with 1 tsp oil, add finely minced garlic.
Then goes the Ginger Chili paste, you can use Chili sauce if you have.
 Then add the onions from the spring onions.
 Next goes Ajinomoto, Salt, Soy Sauce. Saute well.
Cook till the onions are done.
Then add the fried Manchurian to the sauce, saute well. Since this is a dry version, you don't require to add water or make more sauce.

Finally add the greens from the spring onions. If you prefer spicy Cauliflower Manchurian, add green chilis to the pan while you are sauteing.

Gobi Manchurian Dry ~ Cauliflower Manchurian Dry

Ingredients Needed:

For the Cauliflower:

Cauliflower florets - 4 cups
All purpose flour - 2 cups
Corn Flour - 1 cup
Rice flour - 2 tblsp
Salt to taste
Ginger - Chili paste - 3 tsp*
Oil for deep frying

*Increase more if you prefer spicy florets

For the Manchurian Sauce:

Oil - 1 tsp
Garlic - 4 cloves
Spring onions  - 6 big bulbs
Soya Sauce - 3 tsp
Tomato Ketchup - 2 tsp
Tomato Chili Sauce - 2 tsp
Ginger Chili paste - 2 tsp / Chili sauce - 3 tsp
Salt to taste
Ajinomoto - a tiny pinch (opt)

Method to prepare:

For the Cauliflower Manchurian dry

Wash the cauliflower in regular water and chop them into bite size florets.
Then soak in lukewarm salted water for 10 mins. Drain them once done.
Take the flours in a bowl, mix all of them together, along with salt, ginger chili paste. Slowly add water to get a dropping consistency batter
Heat a pan with oil. Once hot, gently drop in the florets using a spoon and fry on both sides.

To make the Manchurian Sauce

Heat a non stick pan, add oil. Saute the minced garlic, then add onions. Fry till the onions turn colour. Then add the soya sauce, tomato ketchup, tomato chili sauce, ajinomoto, salt and simmer for 5 mins.

Then add the fried Manchurians to the sauce and saute well on high.

Just before serving, add the greens of the spring onions and serve.


Notes:
  • This is typically one of those recipes for which you end up adding more flour for the batter based on how well the florets get coated and fried. Also you end up tasting for crispiness after frying one floret for testing.
  • AjinomotoIndo Chinese dishes ought to have this, it will not alter much if you omit.
  • You can increase the spiciness by adding green chilis, it's all your choice.
  • You can make both at different times and serve together by heating it just before serving if you feel the work is too much for one sitting.

Sending this to Priya for Kid's Delight, themed on No Egg/No Butter, Ghee/No Sugar .

Friday, March 4, 2011

Masala Cut Mirchi ~ Street Food

As I mentioned yesterday, I got to know about the different dishes that hubby dear enjoyed during his childhood days in one of our discussions last week. As in a true sense of pursuit of happiness, I wanted to recreate the magic of our childhood and see if we can capture that essence again. Of course when I probed him further to ask if it tasted same, he disappointed me saying that it was so long that he no longer remembers the taste. I reminded him of Ratatouille. It was one of the finest movies we watched, especially with a food backdrop.
Whenever he says I should make like what my Amma makes or like Athamma makes, he reminds me that as Anton remembers his mom's cooking, the dish should bring in the same effect. So I told him this ought to remind him of his childhood. He replied back saying Vankaya Pappu has that effect and nothing else. Well that's bad as he had to eat this, but when he did he said he tasted great.

Of course I didn't give this to Konda, but imagine my nephew and nieces eating this with great enjoyment. They love Cut mirchis and with the masala no doubt!


The Mirapakaya Bajjis are made the regular way, only when it is almost done, it is removed, cut into smaller bites, and put back into hot oil to fry it more crispier.


Then once it is done, there are two ways to do it. Either you sauté the finely chopped onions in a pan, add coriander, spice powder along with the cut mirchis. Saute well and serve.


The other way is to add the onions and coriander raw with the masala sprinkled on top with lemon squeezed. This is typically served in a paper cone that is so famous of the roadside eatery shops.

Required Ingredients.

Prepared Mirapakaya Bajji - 5
Lime Juice
Onions - 1
Coriander Leaves
Masala powder  - 2 tsp

Masala powder (Pappula podi) - Roasted fried gram, Red Chili powder, Garlic and Salt to taste

Cut the Mirapakaya Bajji into small pieces.

Heat Oil in a kadai, deep fry the bajjis till they are little brown.
Heat a pan with oil, saute the onions, add the hot cut mirchis, sprinkle the spice powder, salt and coriander leaves.
Just before serving sprinkle lime juice on the cut mirchi.
Serve with onions.


Imagine for a moment you got a coin on yourself, you rush down the road towards the cart that serves these spicy bajjis. With great excitement you extend your hand towards the vendor, who looks nonchalant at you. He carries on his task silently, takes the bowl that had almost cooked cut mirchis, puts them back into hot oil, tosses them for a moment, to be removed back to the bowl. He has the other stuff all chopped ahead, from which he quickly scoops out with hand and hurriedly puts on the top of the hot mirchis, sprinkles the spice masala, coriander leaves, finally to squeeze a lime over it. Out comes a paper that is rapidly tuned as a cone, takes a heap of the masala cut mirchi and puts into the cone for you. You sit back to enjoy a bite of the spicy cut mirchi, with tears threatening to roll down, fumes gushing out from ears, you still continue to enjoy every mouth, that simply still takes you to heaven! I don't know this for sure, but this is how hubby dear conveyed his experience as a kid.

Sending this to Kid's Delight,- hosted this month by Champa themed on Restaurant Recreations.

Check out the bloggers doing the Marathon along with me..

Group 1
30 Minutes Meals: Gayathri Anand
Baked Goods: Monika,
For On Going Events: Gayathri Kumar, Usha  
Kids Friendly: PJ, Savitha, Smitha, Veena Aravind 
Rice Varieties: Champa, Divya, Padma

Group 2
30 Minutes Meals:Priya Mahadavan, Pavani,
Seven Days of Salad: lla

For Ongoing 7 Events: Priya Suresh, Harini Suma Gandlur,

Kids Friendly: Vatsala, Jay, Kamalika,

Seven Days of Rice: Veena Krishnakumar, Priya Vaasu, Padma Rekha,


Divya Vikram,

Thursday, March 3, 2011

Masala Mirchi Bajji | Mirchi Bajji with Masala | Mirapakaya Bajjilu | Step by Step Recipes

There are certain dishes you ought to recreate if you want to capture the essence of those childhood days. And the next few posts will be in true sense of those moments. I have heard hubby talking so much about his childhood days spent eating these delicious evening snacks, that I always wanted to visit his hometown just to taste these snacks that he keeps talking about. 

Amma used to make Mirapakaya Bajji with those special chillis that are not spicy, but only after marriage I was introduced to these bajjis that are made with the regular green chilies. Now I came to know later that in Ananthapur, you get a variety that is not spicy at all. I have tasted it and was wonder-struck that a chilli can look so green, yet wasn't hot! But it is true. Still even there you got to search for it and get it right, else you end up with a hot spicy chili. 

But guess what the kids who grew up there can easily eat a spicy stuffed chilli without battering an eyelid. I have seen my nieces and nephew doing just that and even I won't venture. So when Athamma makes it for me, she makes sure she sautes it and makes it less spicy. 

Last week when I was discussing with hubby dear on his childhood food that he might want to eat again, he was telling me about all these different snacks that gets done on the road side eatery shops and I could sense and see a twinkle in his eyes, he was transported to days bygone, and with a sign ended saying those were the best time.


I have already posted on how Athamma makes the Mirapakaya Bajji and yes I have also captured a Video with Athamma making the Mirapakaya Bajji knowing very well that this is something you ought to see to get it right, let me tell you even after seeing it's hard to get it done the right way. So I choose the easy way out and request Athamma to make this always. 

My kids love Uggani, which again is a specialty dish from Hubby dear's hometown. Imagine my joy knowing that I get to eat such delicious dishes on regular basis. Though I have learnt to make the perfect Uggani, getting the chili right is not yet done. These posts are the ones I posted during the initial period, I am yet to get back to updating the pictures. But I guess you will enjoy reading on them.

I made Uggani for dinner last night and kids loved. I wanted to make sure get the Masala Mirchi Bajji done too. When hubby dear walked in home, he was happy being greeted by an aroma that was tantalizing. With hurriedly clicking pictures of the finished snacks, we enjoyed! Agreed it was spicy though he didn't show any reaction.


Step by Step pictures for making Masala Michi Bajji.


Select tender long chillies, remove the seeds, stuff with roasted cumin powder

Another stuffing is with roasted fried gram, chili powder, salt and garlic.


Chillis stuffed with different masala.


Heat the oil, when it is hot fry the stuffed Bajji dipped in Besan.

 Remove once the bajji is cooked on both sides. Using a sharp knife cut in middle

Stuff it with finely chopped onions, coriander leaves.

Top it with spice powder that is made with fried gram flour, Red chili powder garlic and salt.


Mirapakaya Bajji is made as the same way as I have posted. Check out the Mirapakaya Bajji Video
This is served with Uggani.

Konda normally loves to eat these spicy Chili bajji, by eating just the outer layer of Besan. It will still spicy stuff.

Note: These are regularly made with chillies that are sauteed ones for the kids, which are not very spicy. But kids growing up in Anantapur eat this as they are used to it.

Sending this to Kid's Delight,- hosted this month by Champa themed on Restaurant Recreations.
I hope she accepts this!

Check out the 11 bloggers doing the Marathon along with me..

30 Minutes Meals: Gayathri Anand
Baked Goods: Monika,
For On Going Events: Gayathri Kumar, Usha
Kids Friendly: PJ, Savitha, SmithaVeena Aravind
Rice Varieties: Champa, Divya, Padma,