Wednesday, November 23, 2011

Seppankilangu Puli Kulambu | Colocasia Curry in Tamil Style ~ Step by Step Recipe | Lunch Box Recipes

If there is one dish that can bring back life to your dead taste buds, then it's the Puli Kulambu for you! This type of tamarind based gravy is typically famous in Tamil Nadu and I must say it's surely an adapted taste. However once you get used to the taste, there is really no stopping!

For all the 40 years that we have been in Tamil Nadu, I am sure we can claim we have got ourselves adapted to the taste that comes. Though Hubby dear is yet to get addicted. I have been happy that Athamma shares my liking and occasionally I decide to make this gravy just for us. Needless to say Amma makes the best Puli Kuzhambus, with many adds on it, like varthal, manathakali, etc. She even adds Okra, Garlic or just simply a simple tamarind base.


Whatever vegetable that goes in doesn't really matter. Dad loves this so much that he would want this to be kept for couple of days. Because of the tamarind base, this gravy stays good for 3 -4 days. There was a time when we used to make this often. These days it's gone to the back list.

Many days went by and we were just lunching on the everyday Sambar or dal. Imagine a week with just these alternating. Suddenly I decided I would make this Puli Kulambu just for us, even if hubby dear will not touch it. Should I say how happy I was hearing the happy tones from Athamma or from Daddy who elated that he was treated to a meal with Puli Kulambu!


Pappu Charu, Seppankilangu Puli Kulambu, Ragi Sankati, with Rava Kesari ~ Our meal today

Step by Step Picture Recipe
All the ingredients that went into the gravy!
Onions, curry leaves along with garlic sauteed in Oil
Till the onions turn colour.
Then goes the tomatoes.
Add all the spices along with salt.
Cover and simmer for 10 mins.
After 10 mins.
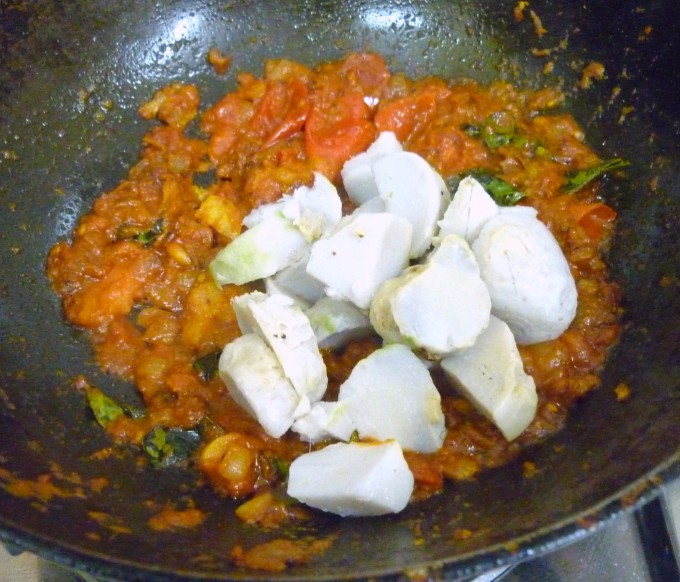
Add boiled and cubed Arbis to the pan.
Mix well with the gravy.
Continue cooking for 2 mins.
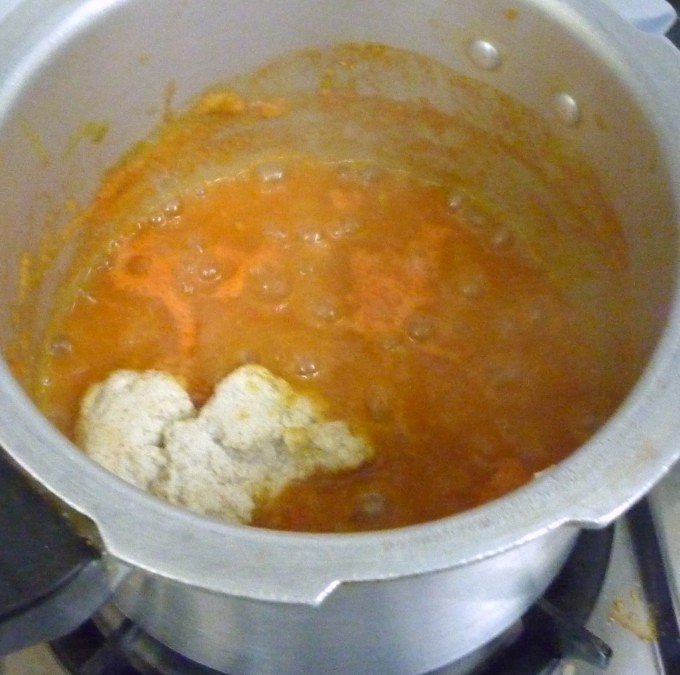
Then add tamarind juice
Followed by 1 -2 cups water.
Coriander leaves for that wonderful aroma.
Bring to boil and simmer for 5 mins to thicken.

Seppankilangu Puli Kulambu | Colocasia Curry in Tamil Style

Ingredients Needed:

Arbi / Colacasia / Seppankilangu - 4 -5 medium size
Onions - 3/4 cups
Tomato - 1 cup
Red Chili powder - 1 tsp
Coriander powder - 1 tsp
Sambar powder - 1/2 tsp
Turmeric powder a pinch
Tamarind juice - 1/2 cup
Water - as required to get a thick gravy
Curry leaves few
Mustard seeds, Urad dal - 1/2 tsp
Garlic - 2 big cloves
Salt to taste
Oil - 2 -3 tsp

How to make Seppankilangu puli kulambu

Wash and make sharp inserts into the arbi. Microwave for 10 mins, check if the arbi is soft, else microwave for another 3 -5 mins. Allow to cool, peel the skin and cut into cubes.

Heat a kadai with oil. Add the mustard Seeds, urad dal, curry leaves and chopped garlic. Fry for couple of minutes, then add finely chopped onions. Saute till the onion turns brown.

Next add finely chopped tomatoes, along with salt, turmeric. chili powder, coriander powder. Cover with lid and cook in sim for 10 mins for the tomatoes to be done well.

Once the tomatoes are soft, add the cooked arbi, saute well and again cook for 5 mins in high. Simmer with lid covered for 2 mins.

Add the tamarind juice, mix everything. Then add water, combine all the ingredients. Bring to boil. Cook in high for 5 mins. Then simmer for 10 mins with lid covered till the gravy is thick.

Notes: 
Arbi is mostly considered to get itchy reaction sometimes. To prevent this, the roots are normally boiled with tamarind juice. I normally don't follow this method.

Normally salt and turmeric powder is added to the tomatoes to get them cooked fast. I added all the spice powders along with salt and simmered with lid covered for 10 mins. 

We had the most satisfying meal after a long time and enjoyed the gravy for couple of days. The gravy normally can stay good for 4 -5 days when refrigerated. 

Check out the Blogging Marathon page for the other Blogging Marathoners doing BM#10

Tuesday, November 22, 2011

Mixed Vegetable Kurma ~ Madras Style | Mixed Vegetable Korma Step by Step Recipe | Lunch Box Recipes

Today we are starting the second group of the Blogging Marathon Edition #10. I decided to do the Lunch Box series, basically it's more like what one makes for a typical meal or pack for office. Since I pack and carry my lunch, I decided to share my everyday box for this week. These may not always be a full three course meal, I warn ahead.

I get frequent emails asking to share my Menu planning or my lunch box menu. I have stopped publishing my menu sheet sometime back, basically because I wasn't making anything new. Somehow things fall in place with the few restrictions I have in my usage of ingredient. Still we have managed quite well.

It should become easy now, that we have a fixed day for buying the vegetables. We do it every Sunday morning and I pretty much plan what I am going to make through the week, both for lunch and dinner. Though seeing the pattern I may not have been that adventurous. I am planning to change that and decided to try at least couple of new recipes every week. My recipe collection is brimming out with so many new ideas to try.

Anyway coming to today's post, today's recipe was something that I made as I went on. It was loosely based on the way the kurmas are normally prepared in hotels. The kurma was lip smacking with Rotis, I am sure it would taste great with Naans.


Step by Step Picture Recipe:


Madras Mixed Vegetable Kurma

Ingredients Needed:
 
Onion paste
 
Onions, puree - 1 cup
Cumin Seeds - 1/2 tsp
Fennel Seeds - 1/2 tsp
Green Chilies - 2 medium
Garlic - 2 medium cloves
Ginger - 2"

Coconut Paste:


Coconut, finely chopped - 1/2 cup
Poppy Seeds - 2 seeds
Green Chilies - 1 medium

Other ingredients

Tomatoes, puree - 1 & 1/2 cup
Vegetables - 2 cups (Carrots, Beans, Turnip)
Coriander powder - 1 tsp
Turmeric powder a pinch
Coriander leaves, finely chopped - 2 tsp
Tomato, finely chopped - 1 small
Oil - 2 tsp
Salt to taste

How to make the Madras Mixed Vegetable Kurma

To make the Onion paste:

Roughly chop the onions, garlic, ginger, green chilies. Grind this along with cumin seeds, fennel seeds using little water to make a smooth paste.

Trim and chop the vegetables, keep aside.

To make the gravy:
Heat a pressure cooker with oil, add the onion paste and sauté the paste till it's done. Cover with lid, saute for couple of minutes, when the oil starts coming out and the onion paste is well cooked, add the tomato puree. mix everything well. lastly add coconut paste, salt and turmeric. 

Mix everything well, cook for 2 mins, then add the chopped vegetables, cover with lid and continue cooking for a while.

Next add the coriander powder, coriander leaves, tomato pieces. Cook for 5 mins, then add 1 cup or little more, depending on the gravy thickness. Cover the pressure cooker with lid and cook for couple of whistles, for the vegetables to be done. 

Enjoy with Rotis and salad.

Check out the Blogging Marathon page for the other Blogging Marathoners doing BM#10

Monday, November 21, 2011

How to Freeze Beans - Fresh Pigeon Pea / Toor Dal and store at home | Step by Step Pictures for Freezing Seeds

During the winter season we get many seasonal vegetables, peas, fresh lentils, that we enjoy in abundance. I remember last year thinking about the loads of cauliflowers that come to the market. This year a small cauliflower weighing may be about 150 gms or so costs about 18 Rs, which is very expensive. Still that's not going to stop us from enjoying the vegetables. 

Among these the fresh lentils make a big impact. We get those fresh toor dal, Hyacinth Beans. Hyacinth Beans. / Anapakaya which we remove the outer skin and call it Pithikina pappu. We make pithikina pappu kurma with it that makes an excellent side dish for Dosas.

The term "bean" originally referred to the seed of the broad bean, but was later expanded to include members of the genus Phaseolus, such as the common bean and the runner bean, and the related genus Vigna. The term is now applied generally to many other related plants such as soybeans, peas, lentils, chickpeas (garbanzos), vetches, and lupins.- Wiki

Last year we got so much of these Hyacinth Beans, that we froze for this year. We still have a batch of it left and we also got the fresh ones to the market.

Freezing the beans makes sure you have the beans for using the non seasonal times too. It is normally done by Blanching. Blanching is cooking technique in which food is briefly immersed in boiling water or fat. Vegetables such as green beans are often blanched in order to enhance their natural green color. Blanched vegetables are typically plunged into an ice water bath afterward to halt the cooking process.

Couple of books that I read about freezing advises about this blanching method for freezing.

If you want to see how the plant and seeds looks read this post from our farms.


Fresh toor dal pods
After removing from the outer layer.
Ice water ready to be used.
Boiling water ready to be immersed.
Wash and take the beans in a muslin cloth
Tie it properly with a rope.
When the water reaches boiling point, when it starts rolling stage, immerse the pack into the hot water.
Count for 2 minutes, and remove.
Plunge it immediately into the cold water.
Remove from the cloth
Take the beans in a colander and run it through running water.
Let it stand for 10 - 15 mins.
Dry the beans in a cloth under fan. Before packing the beans, make sure the beans are dry.
Store the beans in a zip lock cover and freeze.

My method is inspired by Chitvish of Induslady, Other interesting reads on storing and freezing, Divya's post on peas. Article on blanching Vegetables with details on timing.

Today is the last day of the BM # 10 Group 1, I took up the theme on Preps and Preserves.


Check out the Blogging Marathon page for the other Blogging Marathoners doing BM#10

Sunday, November 20, 2011

How to Store Curry Leaves? | Preserve Curry Leaves / Kadi Patta as powder | Step by Step Pictures

On Sunday we had our customary vegetable shopping done. I found huge load of curry leaves and wanted to make different podis, and also store them for everyday cooking. Storing Fresh Curry Leaves fresh is a task sometimes, but if you plan and clean it properly it can stay fresh for over a month. 
Sunday is mostly spent cleaning and prepping the vegetables. But it's worth the pains.

I store coriander leaves the similar way, though the second method used for curry leaves may not work for coriander leaves.


How to store Curry Leaves in Fridge fresh - Step by Step pictures

 Fresh batch from the market
Wash and rise in running water and let it drain in a colander.
After 30 mins, the water is almost drained.
 Dry the curry leaves on a towel under fan.
Warp around and make sure the leaves are very dry.
 Take a dry box, place a paper at the bottom. Remove all the leaves from the stem and drop into the box.
When you are done, cover with another paper and close with the lid and refrigerate. When required you can just use it without bothering to wash.

The other tips to Store Curry Leaves, the second way to store the curry leaves would be to make a powder of them fresh and store in an air tight container.

This can be simply done in a microwave for 3 - 4 mins depending on your microwave. The first time I did, I had to experiment. So I started with 30 secs, another 30 secs,1 mins, 2 mis. So looks like finally after 4 mins the curry leaves were crisp that you could just crush them in hand and store.

Once the curry leaves are dry, remove the leaves from stem, take them in a mw safe plate, mw for 30 secs
Then for another 2 mins, depending on your mw
 This is after 2.30 secs
This is the final powder that you get, it can be stored and used in sambar, gravies. Just add a small pinch for not altering the taste, yet including the goodness of curry leaves.

Can be used in takda of chutneys, dals etc.

Sending these quick basics made in Microwave to Vatsala, who is hosting this month's Microwave Easy Cooking Event.

Check out the Blogging Marathon page for the other Blogging Marathoners doing BM#10