Sunday, October 16, 2011

Pesara Karapusa | Moong Dal Ompodi / Sev | Diwali Savories | Step by Step Recipes

For the second day of the Blogging Marathon, as a Diwali special we made this savory dish with Moong dal along with Rice flour. We made both the flours at home, it turns out pretty easy too if you want to make it for smaller quantity.

It's called Pesara Karapusa, which unlike the Ompodi, tastes more like a thin murukku. Of course you can replace this for your regular ompodi in your Bhel or just snack on it. If you have the moong dal flour ready at hand, this is a quick dish to make. 

Sunday was very hectic as I met my school friends. Some of them I am meeting after 19 years. It was total fun time and enjoyed the nostalgic memories that came back to mind. Kids are having a day off because of the local elections, while that gives me some breathing space to make something new.


Pesara Karapusa | Moong Dal Ompodi / Sev ~ Step by Step Picture Recipe


Pesara Karapusa | Moong Dal Ompodi

Ingredients Needed:

Moong Dal - 1 cup
Rice flour - 2 cups
Red chili powder - 1 tsp
Ajwain / Bishop weeds - 1 tsp
Salt to taste
Water - for kneading
Oil for Deep frying

For using the Ajwain/ Bishop weeds:

When you have to use Ajwain in snacks as these, you can use it in two ways.

1. Soak Ajwain in 1/2 water for 10 mins, grind in a mixer. Strain through a sieve and use the water while mixing the dough.

2. Heat a pan, dry roast the Ajwain, allow to cool and then grind to a powder.

You can follow either of the above methods when you want to use ajwain in the savories.

How to make Pesara karapusa

Roast and grind moong dal to a fine flour. Same for Rice flour.

In a bowl, take the flours, add red chilies, salt.

Add the vamu/ Ajwain to the flour. Add water slowly till you get a soft dough.

Fill this into Ompodi achu and press it out in hot oil.

Cook on both sides and drain to a kitchen towel.
Sending this to the following events:

Suma, who is hosting my favorite event MLLA# 40, an event started by Susan


Serve it - Festival Potluck hosted by Krithi and Danny 


Check out the Blogging Marathon page for the other Blogging Marathoners doing BM#9

Saturday, October 15, 2011

Moong Dal Laddu | How to make Pesara Pappu Ladoo | Diwali Sweets | Step by Step Recipes


Blogging Marathon Edition 9 starts today with about 24 bloggers joining me these two weeks. I had given a month's break during September for the Navaratri pooja. I was glad knowing that Blogging Marathon was missed. I had spent sometime thinking over the themes and wanted to make sure that the themes are interesting to make the bloggers think out of box. I also wanted to make sure we cook for the Diwali that's coming round the corner.

Kid's Delight this month is hosted by Harini, themed on Dressing up leftovers for Kids. Hope you can dish out something interesting for the event.

But before venturing into the post, I wanted to share some heartbreaking news. It's been on my mind, but unconsciously refused to think about it, hoping it will not be true. Jayasree Satish, a very dear friend and a wonderful blogger passed away. She was so active and enthusiastically participated in all the events I held.  Above all, she was a person I felt one can get to be friends on the first meeting. I am so sad that I never could meet her. When she first joined Blogging Marathon, she had such kind words for the entire concept. I will be missing her and I am sure she would have enjoyed this edition also. This edition is going to be a tribute to her and her wonderful cooking.

Coming to the recipe for the day, this is a dish that Amma makes. It's wonderful to know that you can make such delicious laddos with common ingredients. I would like to thank my cousin for helping us out with in making this dish..


Moong Dal Laddu | Pesara Pappu Ladoo ~ Step by Step pictures


Dry roast the moong dal and cool
 In a mixer, sieve it to a fine powder, repeat this couple of times till you get a fine powder.

Powder cardamon with sugar to a get cardamon powder.
 All the ingredients in one place.
 In a non stick pan, heat ghee, dry roast the nuts, remove and then roast the freshly grated coconut.
 Then add powdered jaggary.
 After few minutes, the jaggary will start melting.
 Slowly add the powdered moong dal and mix.
Finally add the roasted nuts.


Pesara papu Ladoo | Moong Dal Laddoo

Yellow Split Moong dal - 1 cup
Fresh coconut, grated  - 2 cups
Jaggary - 1 cup
Roasted Cashew nuts, Almonds, Raisins - 2 tbsp
Ghee - 2 tbsp
Cardamon powder a pinch

How to make Pesara papu Ladoo | Moong Dal Laddoo

Dry roast the moong dal and grind to fine powder.

Heat a non stick pan with ghee and roast the dry fruits. Roast well and keep it aside.

Grate coconut and roast the coconut in ghee. Add jaggary and it will melt by the heat. After a while the jaggary will start to melt and bubbles will start to form. Switch off the flame.

Then add the roasted moong dal and mix well. Add the roasted nuts.

Allow it to cool down a bit, then make into balls.


Notes: You need not worry about making the balls when it is still hot, you can allow it to cool a bit and then make balls.

Sending this to the following events:


Suma, who is hosting my favorite event MLLA# 40, an event started by Susan

Gayathri  who is hosting 'Only'- Sweets and Desserts, an event started by Pari
Serve it - Festival Potluck hosted by Krithi and Danny 


Check out the Blogging Marathon page for the other Blogging Marathoners doing BM#9

Friday, October 14, 2011

Cholafali Recipe ~ Gujarati Farsan Diwali Special | How to make Chola Fali Step By Step Recipe | Indian Cooking Challenge for September

When it came for the time to decide for this month's Indian Cooking Challenge, I completely got off the trend and forgot that Lataji had given me the recipe, and also a pictorial post for us to know ahead on how to make these Cholafali, a Gujarati Farsan specially made for Diwali. I was happy in selecting this as I wanted something special for Diwali for the readers.

Hope you will enjoy making this snack for this Diwali. We have been interacting on this savory for as long as two months, since Lataji told me about her Gujju friend. I was so happy when she offered to make it ahead so that we can have enough notes to get it right ourselves. I must thank Lataji for doing this snack ahead for us, as I ended up looking at the post during my preparation of this snack.


I did a quick check on the net wanting to check if there were other versions of this interesting snack and quickly landed in Preeti's space, who has a recipe with a different measurement. So I decided we can have two different proportions as a choice.

I ended up buying ready made flour for Urad dal and Moong Dal. But on sieving the flours I realized the Moong dal should have been made from Split yellow dal and not from whole skinned Moong dal, as it had that typical raw smell. Though I am just assuming on this. I adapted from Lataji's version and had asked Amma to help me making this.We went by the instructions to the T, however we felt the dough could have been little more softer in our case as it was extremely hard to pound it. Again I could be wrong on this.

The first time I let it rest for just couple of minutes, though later we realized that it needs about 10 mins of resting. Also the oil was not enough, so we ended up dusting with All purpose flour and rolled out very thin. When the dough was wee bit soft and rested for 10 -15 minutes, we were able to get puffed up cholafali, else it did turn crispy though they didn't puff up. Pounding was done about 10 mins on each ball.


 Ready made flours - Gram flour/ Besan , Urad dal flour, Moong Dal flour.

 Dry roasting the salt in the same pan in which the cholafali will be fried.

 All the flours taken in a bowl along with Salt
 Cooking soda added to the flour
 And everything sieved together.
 Only after getting this we realized it should have been yellow moong dal flour which will not have the skin on.
 Add the ghee
 Crumble everything together.
 Slowly sprinkle water and knead to a stiff dough.

 It was this stiff and cracking. Yet the moong dal had some gluten and it was not exactly that brittle.
 This is after resting it for 10 mints and adding few more drops of water.

Pounding it to your heart's content.


 We were able to get this transparent sheet like dough only after dusting it with little all purpose flour and rolling out.
 This was the second batch that puffed up very well.
 A mix of kali namak / Black salt with chili powder.
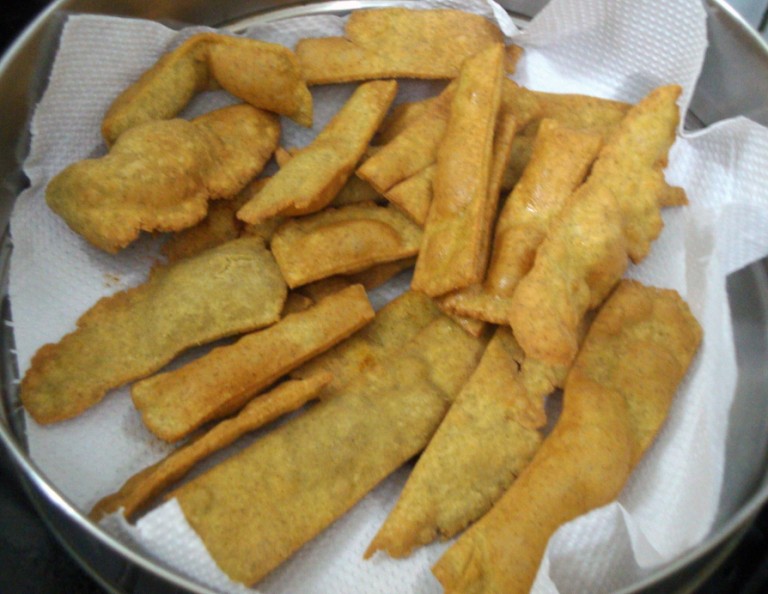
 Fried batch from the first slot.
 From the second slot.
 Even though these didn't puff up, they were very crispy and Konda loved it.


Cholafali | Chola Fali
Adapted from Lataji's version of Cholafali

Ingredients Needed:

Gram flour / Besan - 2 cups
Mathia flour - 2 cups  (alternately, mix 1 cup each of powdered urad dhal and powdered moong dhal)
Ghee - 2 tbsps
cooking soda - 1/8th tsp
Salt as per taste
Oil - 4 tbsp
Oil for deep frying

For sprinkling on top:

Red chilli powder - 3 tsps
Black Salt / Kala Namak - 3 tsps


Notes: The salt to be added should be first dry roasted in the pan that you are going to deep fry the cholafali. This way it will not absorb lot of oil during frying. Make sure you don't add too much as you will be sprinkling black salt on the fried snack.

Original recipe says we need to use 4 tbsp for pounding and to grease the surface. We had the need to dust the dough with Maida before rolling out thin sheets. So one will ultimately check out the dough that's formed.

How to Make Cholafali / Chola Fali

In a wide bowl, take all the flours along with the roasted salt and soda. Sieve it together and mix well.

Add the ghee to the flour. Mix well.

Now start adding very little water and knead to a stiff dough. At this stage the recipes says it should be so stiff that you may feel it crack. But I think you can add few more drops of water and knead again.

Rest the dough for 10 - 15 minutes.

Clean a portion of the kitchen floor / counter top for pounding the dough.

Before starting to pound, knead the dough again. Then divide the dough in smaller portions. Using a pestle, beat the dough down on the clean surface adding few drops oil every now and then. Repeat the fold / beat/ grease/ fold operation until the dough feels light and elastic and acquires a lighter shade.

After few times we realized that we had to dust it with all purpose flour and we did it. I am not sure how authentic this step is, but it surely helped us get the rolled out sheet very thin and off the surface.

Repeat with the entire portion of the dough.

Keep this dough covered while you pinch out small balls off it and roll out thin discs.

It is advised to keep the rolled discs also covered to avoid drying by exposure to air. Since we fried in batches, the rolled out pieces were fried right away.

Keep the oil for deep frying on.

Cut out strips off the dough.

Meanwhile, mix the black salt and red chilli powder in a bowl and keep ready.

When the oil is hot, deep fry the strips, few at a time in hot oil.

Depending on how well you have pound and rolled out, the cholafali will puff well. Fry them until they are crisp.

Remove from the oil with a slotted ladle and transfer to a dish.

Check for the crispness and sprinkle the chilli-salt mix on top immediately while the falis are warm.

Serve them as a snack and enjoy!


Notes:

The dough has to be stiff but still pliable. This is got by pounding well.

Beating it down well ensures that the falis puff well.

Make sure you roll out very thin, as thick strips will tend to become soggy.

Do not add more than the required amount of oil. Else it will end up being very oily. To make sure you are able to handle it well, you can dust it with little flour.

Preeti's version of Cholafali

Ingredients

Besan / Chana dal flour / Gram Flour - 1 cup
Urad dal flour - 1/2 cup
Oil - 1 tsp
Red chilli powder - 1 tsp
Cooking soda - a pinch
Normal salt & Black salt to taste

How to make cholafali

Boil 1/2 cup of water and add oil, salt and soda into it.

Take the flours in a bowl, when water gets warm, slowly add to the flour and knead a dough. Keep aside for 15 minutes.

Make small balls of dough and roll out very thin rotis of it.

Cut it into thin strips. Deep fry in oil on medium flame.

Sprinkle red chilli powder and black salt on it. Store it in a airtight container.

Serve it with mint chutney.


Even though in between the process we felt we got struck with the recipe, we managed to get it done very well. I mostly think of making half the measurement that's given. This was the first time I felt I should make the entire measurement given, knowing and seeing how well it had been in Lataji's pictures. Anyway I was so happy that Konda loved this so much that she has been taking this for her snacks daily.

Everybody at home, knows that I am into my ICC experiments when I make such elaborate preparations. They were curious to know which state I was doing this time. There was even expressions that said why should I want to try such hard and unknown dishes. Well I guess after tasting such a tasty dish, I am sure they will not complain again.

Plus even though we got so much of it, it's completed now. This is surely something that you must try. Though I know this needs practice over years. 

To all my ICC members, please link your Cholafali post to Mr. Linky.


Tuesday, October 11, 2011

Coconut Mint Chutney Recipe | Pudina Kobbari Pachadi

The last couple of months it's been a search for chutneys that have longer shelf life, at least until afternoon in this hot climate. Most times we resort to making fried tomato based or onion based or even simpler version of a Mint /  Pudina chutney for the Idlies or Dosas I pack for Hubby dear. When I asked him if I should be making that simpler version of Mint chutney I immediately got a strong response. He said he was bored of that version and more it was so minty that it didn't really suit his taste. 

Athamma jumped in to say that the version where she fries most of the ingredients will be excellent and moreover can stay good for more than 4 - 5 hrs, maybe even till evening even when stored in room temperature. We checked it in afternoon and it still tasted great. Of course you can refrigerate and not worry about it normally. I am talking about the time when you got to pack your lunch with this chutney, in climates that are as hot as ours is normally.

While fried gram is not added to this, I know Amma adds to this chutney. I am sure I can save it up for another day.


Mint Coconut Chutney | Pudina Kobbari Pachadi

Ingredients Needed:

Mint Leaves - 1/2 bunch
Onions - 1 medium
Tomatoes - 1 medium
Tamarind pulp - 1/2 tsp (opt)
Green Chilies - 4 medium
Fresh Coconut, finely chopped - 1/2 cup
Salt to taste
Garlic, raw - 2 big cloves
Oil - 1 - 2 tsp

How to make Coconut Mint Chutney | Pudina Kobbari Pachadi

Wash the mint leaves couple of times to make sure it's clean.

Chop the onions, tomatoes roughly. Keep it aside.

Heat a pan, when hot add few drops of oil, saute the chilies and onions to brown. Remove and saute the mint leaves. Remove add few more drops of oil and saute the tomatoes well.

If you want you can roast the coconut also, but here it was added raw. Allow to cool. Just before grinding add the garlic cloves.

Pulse everything together, add little water for everything to blend well. You can make this little loose or thick chutney depending again on your choice.

Temper with mustard, urad dal and curry leaves if you want. It can be served even out that.


Makes an excellent side dish for Idli and Dosas.

Notes: Adding tamarind will keep this chutney good for long hours. If you are not using tamarind, then increase your tomatoes but make sure you saute them well. 

Thursday, October 6, 2011

Blogging Marathon #9 - 7 Day Marathon!

Blogging Marathon was on a break during the September month and now enters into the 9th edition. Because of my Navaratri Pooja, I thought I may not be able to handle two non stop blogging marathon on both the blogs. I was right as cooking special neivedyams on daily basis and blogging about it was really tough. I am so thankful that I was able to complete my pooja. Do check them out when you find time.

Deciding not to have the Blogging Marathon was tough, as it really helps me bonding with my fellow Bloggers. It really creates a good bonding and a great feeling.

I was happy knowing that BM was missed by my fellow BM'ers too. So here's a quick announcement, even though the themes are still forming. I don't want to delay it any more.

Do check back for the updated themes.

Since the 6th edition, I have created a separate page for Blogging Marathon. Once I get all details I will be updating this page. Bloggers taking part in this marathon need to just link back to this page.

If you want to know how the Blogging Marathon started, read the first edition.

So the 9th edition will 16th  - 22nd October and the second group will start on 23rd - 29th October.

Please email me at spicingyourlife@gmail.com latest by 12th October along with your theme.

Mandatory rules for this Blogging Marathon are as below:
  • Will have to post on all 7 days without fail
  • Should follow the accepted theme all 7 days, meaning if you choose one topic like Rice, you should post all rice based recipes all 7 days.
  • Should link to the Blogging Marathon page.
  • Should actively give feedback on others post.
Other rules will be mailed to the individuals.

Themes for this edition are the following.

Seven Days of Indian Festival Food with Step by Step pictures

This can be anything that's prepared during an Indian Festival. Mandatory rule when you select this, your posts should accompany with pictures depicting each step. Since Diwali is just round the corner I am sure this is going to be a big learning theme.

Soups and Salads

You can make either soups or salads in a mix of 3 days or 4 days, choice is yours. But you got to blog only these two options for all the 7 days. Let's not just make it only soups or salads, please!


Dressing up Leftovers for Kids

Have leftovers on hand, then come up with ideas to make it more appealing and interesting. This can be for any course of meal, and any dish. All you got to do is, use the main ingredient which is a leftover from a previous meal and you dress it up as a new dish.
Update: Harini, who is going to guest host Kid's Delight wanted this theme to be converted to Kids special.  Will be updating the link once she announces the event on her blog

Regional Special

This is a favorite theme of mine. I love reading out those traditional, regional special recipes being dished out for all 7 days. Please remember you should try to choose something that's locally famous or state wise. You can select any Indian State or Country you want.

Snacks in a jiffy for surprise guests

We are always in search of those quick dishes that we can make for surprise guests. In our parts of the world, it is still quite common for folks to just drop in uninformed, to meet you. And getting to know dishes that can be whipped within minutes will surely be a great boon. You can use store bought as part of the ingredients, but will have to keep the major part of the ingredients used as homemade. Like if you want to offer Bhel, the puffed rice, sev can be store bought, but you should be using up the chutneys you made. This is just an example, you can be more creative than this..:)


Food for the wheels

Are you traveling and need ideas to pack food for your trip? Then cook dishes that can stay well for long distances. Minimum hours of travel will be about 5 - 6 hrs of long drive and can be up to two long days in train. As expected, the foods got be mess free but then you can always pack drinks well and take. For example, I once traveled with a Gujju family, they had a complete traditional thali in the train. So this post can have tips on how to carry something well and packed properly, accessories that can be carried. Share your tips and experience etc.

Cooking with Fruits:

As the name says, cook anything with Fruits, it can be any course of meal. But the main ingredient should be a fruit. Technically, eggplant and Tomatoes are fruits but I will not accept them..:)

Please spread the details if you want your friends to be part of this marathon.

Let's gear up for another non stop blogging!

Tuesday, October 4, 2011

Ragi Dosa | Finger Millet pancake, Indian Style | Diabetic Diet ~ 101 Dosa Varieties!

When you plan for breakfasts in the morning, it becomes relatively easy to manage if you have ready to use Idly or Dosa batter on hand. My boys love to eat Dosa most days, while Konda is off the Dosa for a while, which is sad as she used to love Dosas so much. Anyway her fancy is anything with bread these days.

But one can't offer the same dosa every day of the week for the elders at home right. Moreover with the eating habits changed much, I sometimes have to pack Dosas for lunch or even Dinner. Then there are the times when I think I should reach my target of 101 Dosa Varieties and pester Amma to come out with some new proportions. It was one of those moments when Amma ended up trying out this instant Ragi Dosa and I must say it turned out very delicious.

By definition, we can call this instant as this batter need not be fermented after being ground. But Urad dal needs to be soaked and ground to a smooth batter. Normally any dosas made with flours like Wheat, Ragi, Jowar and others etc, are quite instant dosas. When you want to make crepes with these flours, you just have to blend into a smooth batter and make them right away. So Amma wanted to ferment overnight and see. Result was fantastic.

Moreover when you make like this, you can refrigerate the batter for couple of days if needed. Makes a great change from the regular one. And very healthy for a Diabetic Diet.


Ingredients Needed:

Ragi Flour - 1 & 1/2 cup
Urad Dal - 50 gms
Methi - 1/2 tsp

How to make Ragi Flour:

Wash and soak Urad dal for 5 hrs along with methi seeds. Then grind to a smooth paste. Blend the ragi flour with water and mix the ragi flour to the urad dal paste along with Salt.

Ferment overnight.

To make the Ragi Dosa:

Heat tawa, grease with oil. Spread a ladleful of batter and sprinkle oil over this. Cook on both sides.

Serve with chutney

Enjoy with chutney! Though I served with coconut chutney you could serve it with sambar or other healthy version of chutneys as coconut will not surely help..:)